Transformer Encoder 与 BERT 预训练模型完整教程

Transformer Encoder 与 BERT 预训练模型完整教程

一、Transformer Encoder 架构原理

1.1 整体架构概述

Transformer Encoder 是一个由 N 个相同编码器层堆叠而成的深度网络结构(通常 N=6 或 12)。每个编码器层包含两个核心子层:多头自注意力机制前馈神经网络,每个子层都配有残差连接和层归一化。

1
2
3
4
5
6
7
8
9
10
11
12
13
14
15
16
17
18
import torch
import torch.nn as nn

class TransformerEncoderExample(nn.Module):
def __init__(self, input_dim, model_dim, num_heads, num_layers):
super().__init__()
# 将离散的输入 token(如单词的整数索引)转换为连续的向量表示。
self.embedding = nn.Embedding(input_dim, model_dim)
# 单个 Transformer 编码器层
encoder_layers = nn.TransformerEncoderLayer(
d_model=model_dim, nhead=num_heads
)
# 将多个编码器层堆叠在一起,形成完整的 Transformer 编码器。
self.encoder = nn.TransformerEncoder(encoder_layers, num_layers=num_layers)

def forward(self, x):
x = self.embedding(x)
return self.encoder(x)

1.2 自注意力机制(Self-Attention)

自注意力机制允许模型在处理每个词时关注输入序列中的所有其他词,动态计算注意力权重。

1.2.1 核心计算公式

自注意力通过查询(Query)、键(Key)和值(Value)矩阵计算:

1
2
3
4
5
6
7
8
9
10
11
12
13
14
15
16
17
18
19
import torch
import math

def self_attention(Q, K, V, mask=None):
"""
Q: Query矩阵 [batch_size, seq_len, d_k]
K: Key矩阵 [batch_size, seq_len, d_k]
V: Value矩阵 [batch_size, seq_len, d_v]
"""
d_k = Q.size(-1)
scores = torch.matmul(Q, K.transpose(-2, -1)) / math.sqrt(d_k)

if mask is not None:
scores = scores.masked_fill(mask == 0, -1e9)

attention_weights = torch.softmax(scores, dim=-1)
output = torch.matmul(attention_weights, V)

return output, attention_weights

1.2.2 多头注意力机制

多头注意力将输入映射到不同的子空间,并行计算多个注意力头:

1
2
3
4
5
6
7
8
9
10
11
12
13
14
15
16
17
18
19
20
21
22
23
24
25
26
27
28
29
30
class MultiHeadAttention(nn.Module):
def __init__(self, d_model, num_heads):
super().__init__()
assert d_model % num_heads == 0
self.d_k = d_model // num_heads
self.num_heads = num_heads
self.q_linear = nn.Linear(d_model, d_model)
self.k_linear = nn.Linear(d_model, d_model)
self.v_linear = nn.Linear(d_model, d_model)
self.out_linear = nn.Linear(d_model, d_model)

def forward(self, x, mask=None):
batch_size, seq_len, d_model = x.size()

# 线性变换并分头
Q = self.q_linear(x).view(batch_size, seq_len, self.num_heads, self.d_k)
K = self.k_linear(x).view(batch_size, seq_len, self.num_heads, self.d_k)
V = self.v_linear(x).view(batch_size, seq_len, self.num_heads, self.d_k)

# 计算注意力
scores = torch.matmul(Q, K.transpose(-2, -1)) / math.sqrt(self.d_k)
if mask is not None:
scores = scores.masked_fill(mask == 0, -1e9)

attention_weights = torch.softmax(scores, dim=-1)
context = torch.matmul(attention_weights, V)

# 合并多头输出
context = context.contiguous().view(batch_size, seq_len, d_model)
return self.out_linear(context), attention_weights

1.3 前馈神经网络(FFN)

前馈神经网络对每个位置的输出进行非线性变换,通常包含两个线性层和ReLU激活函数:

1
2
3
4
5
6
7
8
9
10
class FeedForward(nn.Module):
def __init__(self, d_model, d_ff=2048):
super().__init__()
self.linear1 = nn.Linear(d_model, d_ff)
self.linear2 = nn.Linear(d_ff, d_model)
self.relu = nn.ReLU()

def forward(self, x):
# 输入x形状: [batch_size, seq_len, d_model]
return self.linear2(self.relu(self.linear1(x)))

1.4 位置编码(Positional Encoding)

由于Transformer不包含循环或卷积结构,需要显式添加位置信息。原始Transformer使用正弦余弦位置编码:

1
2
3
4
5
6
7
8
9
10
11
12
13
14
15
16
17
class PositionalEncoding(nn.Module):
def __init__(self, d_model, max_len=5000):
super().__init__()
pe = torch.zeros(max_len, d_model)
position = torch.arange(0, max_len, dtype=torch.float).unsqueeze(1)

div_term = torch.exp(torch.arange(0, d_model, 2).float() *
(-math.log(10000.0) / d_model))

pe[:, 0::2] = torch.sin(position * div_term)
pe[:, 1::2] = torch.cos(position * div_term)
pe = pe.unsqueeze(0).transpose(0, 1)
self.register_buffer('pe', pe)

def forward(self, x):
# x: [seq_len, batch_size, d_model]
return x + self.pe[:x.size(0), :]

二、BERT 预训练任务详解

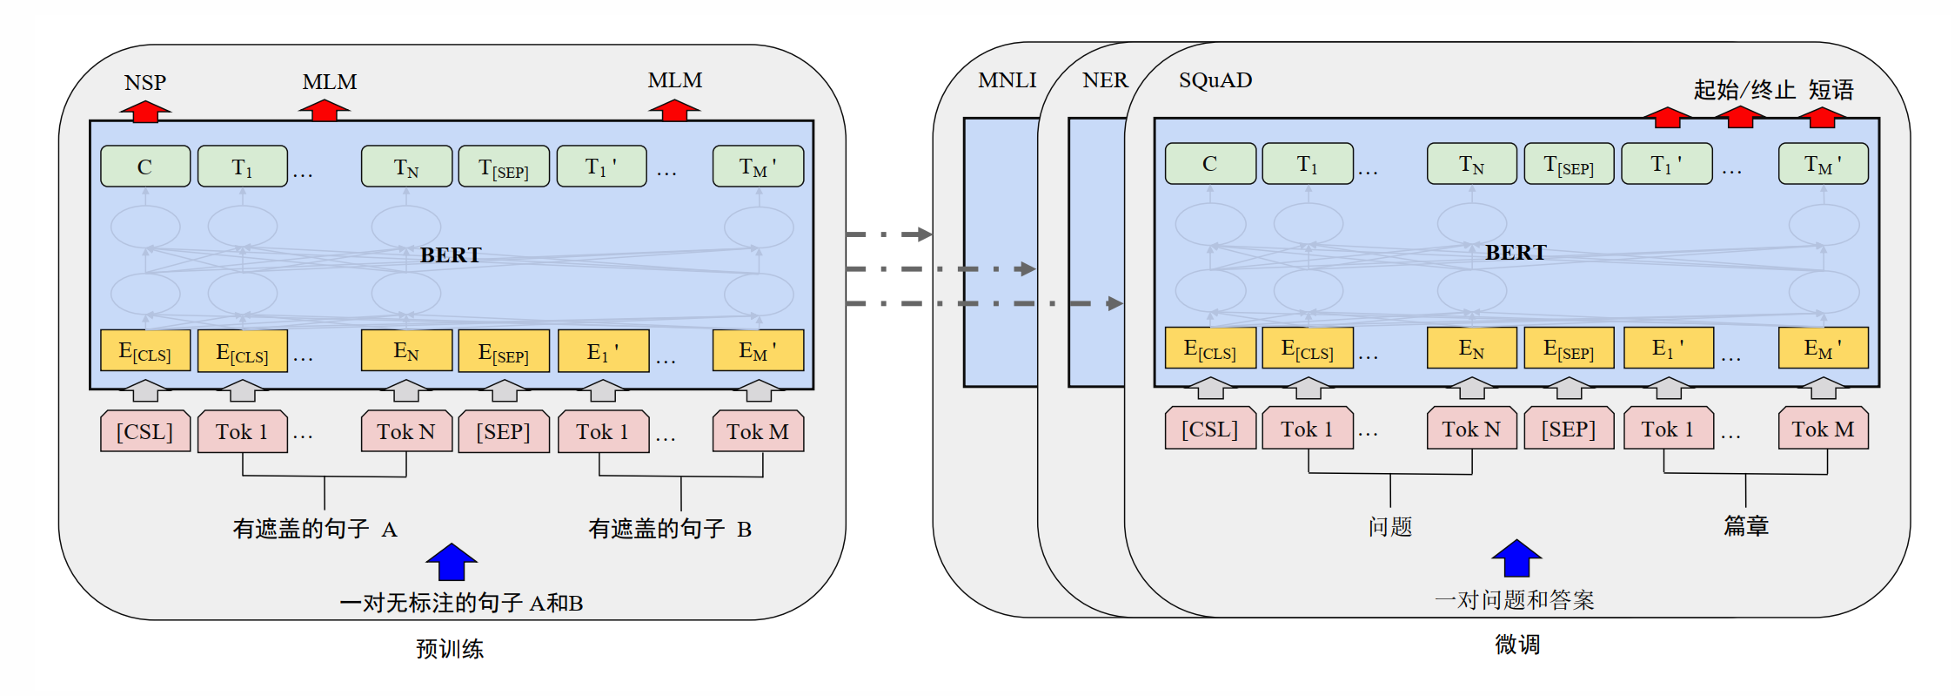
image-20251026154450417

2.1 掩码语言模型(Masked Language Model, MLM)

MLM是BERT的核心预训练任务,通过随机掩码输入词汇让模型进行预测。

2.1.1 15%掩码率策略

BERT采用15%的掩码率,具体分配如下:

掩码类型 比例 目的
[MASK]替换 80% 让模型学习预测被掩盖的词
随机词替换 10% 增强模型对噪声的鲁棒性
保持不变 10% 保持原始词汇的连续性
1
2
3
4
5
6
7
8
9
10
11
12
13
14
15
16
17
18
19
20
21
22
def create_mlm_labels(input_ids, tokenizer, mask_rate=0.15):
"""
创建MLM训练标签
"""
labels = input_ids.clone()

# 创建随机掩码矩阵
random_matrix = torch.rand(input_ids.shape)
mask_matrix = (random_matrix < mask_rate) & (input_ids != tokenizer.cls_token_id) & \
(input_ids != tokenizer.sep_token_id) & (input_ids != tokenizer.pad_token_id)

# 80%替换为[MASK]
mask_mask = mask_matrix & (random_matrix < 0.8)
input_ids[mask_mask] = tokenizer.mask_token_id

# 10%随机替换
random_mask = mask_matrix & (random_matrix >= 0.8) & (random_matrix < 0.9)
random_words = torch.randint(len(tokenizer), input_ids.shape)
input_ids[random_mask] = random_words[random_mask]

# 10%保持不变(已处理)
return input_ids, labels, mask_matrix

2.1.2 MLM损失函数

1
2
3
4
5
6
7
8
9
10
class MLMLoss(nn.Module):
def __init__(self):
super().__init__()
self.loss_fn = nn.CrossEntropyLoss()

def forward(self, predictions, labels, mask_positions):
# 只计算被掩码位置的损失
masked_predictions = predictions[mask_positions]
masked_labels = labels[mask_positions]
return self.loss_fn(masked_predictions, masked_labels)

2.2 下一句预测(Next Sentence Prediction, NSP)

NSP任务让模型判断两个句子是否连续,增强句子级理解能力:

1
2
3
4
5
6
7
8
9
10
11
12
13
14
15
16
17
18
19
20
def create_nsp_example(sentence_a, sentence_b, tokenizer, is_next=True):
"""
创建NSP训练样本
"""
# 添加特殊标记:[CLS]句子A[SEP]句子B[SEP]
tokens = [tokenizer.cls_token] + tokenizer.tokenize(sentence_a) + \
[tokenizer.sep_token] + tokenizer.tokenize(sentence_b) + [tokenizer.sep_token]

# 创建token_type_ids:0表示句子A,1表示句子B
token_type_ids = [0] * (len(tokenizer.tokenize(sentence_a)) + 2) + \
[1] * (len(tokenizer.tokenize(sentence_b)) + 1)

input_ids = tokenizer.convert_tokens_to_ids(tokens)
label = 1 if is_next else 0 # 1表示是下一句,0表示不是

return {
'input_ids': torch.tensor(input_ids),
'token_type_ids': torch.tensor(token_type_ids),
'labels': torch.tensor(label)
}

三、BERT 模型实践教程

3.1 环境准备与模型加载

1
2
3
4
5
6
7
8
9
10
from transformers import BertModel, BertTokenizer, BertConfig
import torch

# 加载中文BERT模型和分词器
model_name = 'bert-base-chinese'
tokenizer = BertTokenizer.from_pretrained(model_name)
model = BertModel.from_pretrained(model_name)

print(f"词汇表大小: {tokenizer.vocab_size}")
print(f"模型参数数量: {sum(p.numel() for p in model.parameters()):,}")

3.2 文本预处理与分词

1
2
3
4
5
6
7
8
9
10
11
12
13
14
15
16
17
18
19
20
21
22
23
24
25
26
27
28
def preprocess_text(text, tokenizer, max_length=512):
"""
文本预处理函数
"""
# 分词并添加特殊标记
encoded = tokenizer.encode_plus(
text,
add_special_tokens=True, # 添加[CLS]和[SEP]
max_length=max_length,
padding='max_length',
truncation=True,
return_tensors='pt',
return_attention_mask=True,
return_token_type_ids=True
)

return encoded

# 示例文本
text = "今天天气很好,我们一起去公园散步。"
encoded_text = preprocess_text(text, tokenizer)

print("分词结果:")
tokens = tokenizer.convert_ids_to_tokens(encoded_text['input_ids'][0])
print("Tokens:", tokens)
print("Input IDs shape:", encoded_text['input_ids'].shape)
print("Attention Mask shape:", encoded_text['attention_mask'].shape)
print("Token Type IDs shape:", encoded_text['token_type_ids'].shape)

3.3 模型推理与隐藏状态分析

1
2
3
4
5
6
7
8
9
10
11
12
13
14
15
16
17
18
19
20
21
22
23
24
25
26
27
28
29
def analyze_bert_outputs(model, input_tensors):
"""
分析BERT模型的输出
"""
model.eval()

with torch.no_grad():
outputs = model(
input_ids=input_tensors['input_ids'],
attention_mask=input_tensors['attention_mask'],
token_type_ids=input_tensors['token_type_ids'],
output_hidden_states=True, # 返回所有隐藏状态
output_attentions=True # 返回注意力权重
)

return outputs

# 进行推理
outputs = analyze_bert_outputs(model, encoded_text)

print("输出结构分析:")
print(f"Last hidden state shape: {outputs.last_hidden_state.shape}")
print(f"Pooler output shape: {outputs.pooler_output.shape}")
print(f"Number of hidden layers: {len(outputs.hidden_states)}")
print(f"Number of attention layers: {len(outputs.attentions)}")

# 分析每一层的隐藏状态
for i, hidden_state in enumerate(outputs.hidden_states):
print(f"Layer {i} hidden state shape: {hidden_state.shape}")

3.4 注意力权重可视化

1
2
3
4
5
6
7
8
9
10
11
12
13
14
15
16
17
18
19
20
21
22
23
24
25
26
27
28
29
30
31
32
33
34
35
36
37
38
39
40
41
42
43
44
45
46
47
48
49
import matplotlib.pyplot as plt
import numpy as np

def visualize_attention(attention_weights, tokens, layer=0, head=0, max_display_tokens=100, figsize_scale=0.2):
"""
可视化注意力权重(优化大维度显示)

参数:
attention_weights: 注意力权重张量
tokens: 文本token列表
layer: 要可视化的层
head: 要可视化的注意力头
max_display_tokens: 最大显示的token数量(超过则截断)
figsize_scale: 每个token分配的图像尺寸比例(控制整体大小)
"""
# 获取指定层和头的注意力权重
attn = attention_weights[layer][0, head].detach().numpy()

# 截断tokens和注意力矩阵(避免维度过大)
n_tokens = len(tokens)
display_tokens = tokens[:max_display_tokens]
display_attn = attn[:max_display_tokens, :max_display_tokens]
display_len = len(display_tokens)

# 动态计算图像尺寸(根据显示的token数量)
figsize = (int(display_len * figsize_scale), int(display_len * figsize_scale))
# 限制最大尺寸(避免图像过大)
figsize = (min(figsize[0], 30), min(figsize[1], 30))

plt.figure(figsize=figsize)
plt.imshow(display_attn, cmap='hot', interpolation='nearest')
plt.colorbar(shrink=0.8) # 调整颜色条大小,避免占太多空间

# 调整刻度间隔(避免标签拥挤):最多显示20个刻度
step = max(1, display_len // 20) # 动态计算间隔
tick_positions = range(0, display_len, step)
tick_labels = [display_tokens[i] for i in tick_positions]

plt.xticks(tick_positions, tick_labels, rotation=90, fontsize=6) # 减小字体
plt.yticks(tick_positions, tick_labels, fontsize=6)
plt.title(f"Attention Weights - Layer {layer}, Head {head}", fontsize=10)

plt.tight_layout()
plt.show()

# 可视化第一层第一个头的注意力(使用优化后的参数)
tokens = tokenizer.convert_ids_to_tokens(encoded_text['input_ids'][0])
# 可根据需要调整max_display_tokens(如显示前150个token)和figsize_scale
visualize_attention(outputs.attentions, tokens, layer=0, head=0, max_display_tokens=150, figsize_scale=0.25)

3.5 完整的文本推理示例

1
2
3
4
5
6
7
8
9
10
11
12
13
14
15
16
17
18
19
20
21
22
23
24
25
26
27
28
29
30
31
32
33
34
35
36
37
38
39
40
41
42
43
44
45
46
def complete_bert_analysis(text, model, tokenizer):
"""
完整的BERT文本分析流程
"""
print("=" * 50)
print("输入文本:", text)
print("=" * 50)

# 1. 文本预处理
encoded = preprocess_text(text, tokenizer)

# 2. 模型推理
with torch.no_grad():
outputs = model(**encoded, output_hidden_states=True)

# 3. 输出分析
last_hidden = outputs.last_hidden_state
pooler_output = outputs.pooler_output

print("\n1. 基本输出信息:")
print(f"最后隐藏层形状: {last_hidden.shape}") # [batch_size, seq_len, hidden_size]
print(f"池化输出形状: {pooler_output.shape}") # [batch_size, hidden_size]

print("\n2. 词向量分析:")
tokens = tokenizer.convert_ids_to_tokens(encoded['input_ids'][0])
for i, (token, vector) in enumerate(zip(tokens, last_hidden[0])):
if i >= 5: # 只显示前5个token
break
print(f"{token}: 向量范数 {vector.norm().item():.4f}")

print("\n3. 层间相似度分析:")
# 计算不同层输出的相似度
from torch.nn.functional import cosine_similarity

for i in range(0, len(outputs.hidden_states)-1, 3): # 每隔3层采样
sim = cosine_similarity(
outputs.hidden_states[i].mean(dim=1),
outputs.hidden_states[i+1].mean(dim=1)
)
print(f"层 {i} 与 层 {i+1} 相似度: {sim.item():.4f}")

return outputs, encoded

# 运行完整分析
sample_text = "自然语言处理是人工智能的重要领域。"
outputs, encoded = complete_bert_analysis(sample_text, model, tokenizer)

四、进阶实践任务

4.1 掩码语言模型预测任务

1
2
3
4
5
6
7
8
9
10
11
12
13
14
15
16
17
18
19
20
21
22
23
24
25
26
27
28
29
30
31
32
33
34
35
36
37
38
39
40
41
42
43
44
45
46
47
48
49
50
def mlm_prediction(text, model, tokenizer):
"""
使用BERT进行掩码预测
"""
# 将文本中的一个词替换为[MASK]
words = text.split()
mask_index = len(words) // 2 # 选择中间位置的词进行掩码
original_word = words[mask_index]
words[mask_index] = tokenizer.mask_token
masked_text = ' '.join(words)

print(f"原始文本: {text}")
print(f"掩码文本: {masked_text}")

# 编码输入
encoded = tokenizer.encode_plus(
masked_text,
return_tensors='pt',
padding=True,
truncation=True,
max_length=128
)

# 获取预测结果
model.eval()
with torch.no_grad():
outputs = model(**encoded)
predictions = outputs.last_hidden_state

# 找到[MASK]位置
mask_token_id = tokenizer.mask_token_id
mask_position = (encoded['input_ids'][0] == mask_token_id).nonzero(as_tuple=True)[0]

# 获取预测分数
mask_logits = predictions[0, mask_position]
probs = torch.softmax(mask_logits, dim=-1)
top_k = 5

top_probs, top_indices = torch.topk(probs, top_k, dim=-1)

print(f"\nTop-{top_k} 预测结果:")
for i, (prob, idx) in enumerate(zip(top_probs[0], top_indices[0])):
word = tokenizer.convert_ids_to_tokens(idx.item())
print(f"{i+1}. {word}: {prob.item():.4f}")

return masked_text, predictions

# 运行掩码预测
sample_text = "今天天气很好,适合户外运动。"
masked_text, predictions = mlm_prediction(sample_text, model, tokenizer)

4.2 句子相似度计算

1
2
3
4
5
6
7
8
9
10
11
12
13
14
15
16
17
18
19
20
21
22
23
24
25
26
27
28
29
30
31
32
33
34
35
36
37
38
39
40
def sentence_similarity(sentences, model, tokenizer):
"""
计算句子相似度
"""
# 编码所有句子
encoded = tokenizer(
sentences,
padding=True,
truncation=True,
return_tensors='pt',
max_length=128
)

# 获取句子嵌入
with torch.no_grad():
outputs = model(**encoded)
# 使用[CLS]标记的表示作为句子嵌入
sentence_embeddings = outputs.last_hidden_state[:, 0, :]

# 计算余弦相似度矩阵
from sklearn.metrics.pairwise import cosine_similarity
similarity_matrix = cosine_similarity(sentence_embeddings)

print("句子相似度矩阵:")
for i, sent1 in enumerate(sentences):
for j, sent2 in enumerate(sentences):
if i <= j:
print(f"相似度({i},{j}): {similarity_matrix[i,j]:.4f}")

return similarity_matrix

# 测试句子相似度
sentences = [
"我喜欢吃苹果",
"苹果是一种水果",
"今天天气很好",
"我喜欢水果苹果"
]

similarity_matrix = sentence_similarity(sentences, model, tokenizer)

五、总结与进阶学习建议

通过本教程,您已经深入学习了:

5.1 核心知识点总结

  1. Transformer Encoder架构:理解了自注意力机制、前馈网络、位置编码等核心组件
  2. BERT预训练任务:掌握了MLM的15%掩码策略和NSP任务的实现原理
  3. 实践编程技能:学会了使用Hugging Face库加载BERT模型并进行文本分析和推理

5.2 常见问题排查

问题 原因 解决方案
内存不足 序列长度过长 减少max_length,使用梯度累积
推理速度慢 模型过大 使用蒸馏版模型或量化推理
中文分词异常 未使用中文分词器 确保使用bert-base-chinese

5.3 进阶学习方向

  1. 模型优化:学习模型量化、剪枝、蒸馏等技术
  2. 领域适配:在特定领域数据上继续预训练
  3. 多模态学习:探索VisualBERT、VideoBERT等多模态模型
  4. 大语言模型:深入研究GPT系列、T5等生成式模型

本教程提供了完整的理论知识和实践代码,建议通过修改参数、尝试不同文本、分析输出结果来加深理解。实际应用中可根据具体任务对模型进行微调以获得更好性能。